
Pinafores are vintage style dresses that never go out of style. Every mother loves to dress her daughter up in classic pinafores. They are also my favorites and my daughters had a number of them in varying styles when they were little.


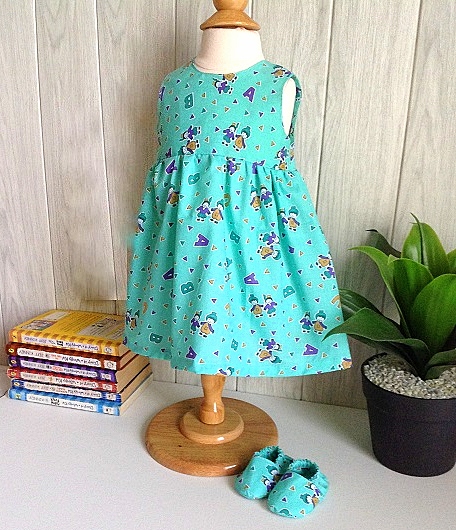
I felt that the pinafores made little girls look more girly and all dressed up. They are awesome when paired with bubble bloomers or diaper covers. They are indeed all-weather wear. You can use them as they are or layer them with tops that have sleeves for the colder months.


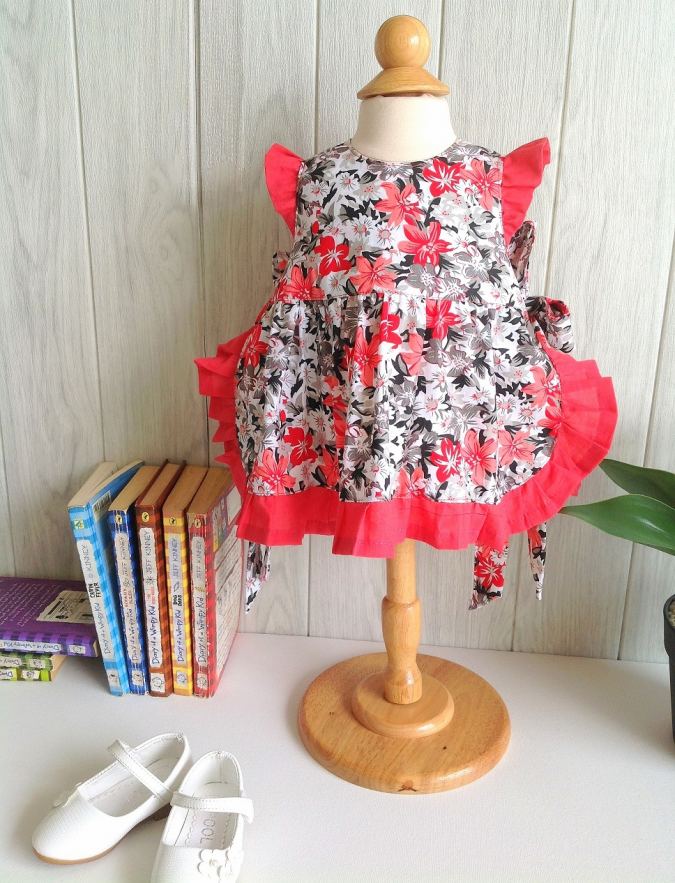
This baby sewing project is of a side open pinafore fastened with ties. This is very easy for on and off and is very roomy and comfortable for the little one. There are ruffles along the armhole and also the hemline. You may replace the fabric for the ruffle and use lace instead to get a prettier vintage style pinafore.


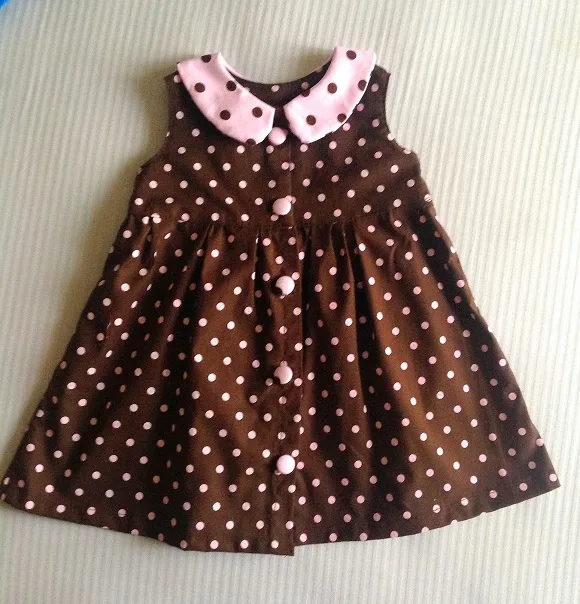
You can use different fabrics for the ruffles and the pinafore body. Polka dots and gingham fabrics look great for this baby sewing project. You can also use florals and solids. In fact, this vintage style pinafore can be made with almost any designs on the fabric.
This tutorial also comes with free downloadable templates for sizes newborn to 12 months and is a fun DIY sewing project.
I have many more free baby patterns. If you would love to see them, find them here:
15 Minute Baby Dress from a Rectangle


If you wish to sew a baby dress with a collar, click here.
Baby Sewing Project (Vintage Pinafore)
Materials Required
1. Medium- weight cotton fabric for the dress body- requirements specified in the table-2 below.
2. Medium- weight cotton fabric for the ruffles- requirements specified in the table-2 below.
3. Sewing Notions.
4. Fabric Marking Pen.
5. Snap Buttons or ordinary buttons.
6. Enter your e-mail address below to download the template.
Pattern Notes
1. All the fabrics used here are of 44/ 45 inches width.
2. The fabrics shown here are only for illustration purposes and as such may vary from the original.
3. The seam allowance is 3/8-inch unless otherwise specified.
4. I suggest you read the entire pattern once before starting to get a general idea.
5. All seams are to be finished by zigzag or serger.
Approximate Finished Measurements
Table-1
- Pinch to zoom for mobile users.


Fabric Requirements
Table-2


Measurements
Table-3


In the table below, “w” stands for the width and “l” stands for the length of the fabric strip.


Take the fabric required for the dress and ruffles.
Cut the templates for the bodice front, bodice back, skirt, and sleeve ruffle at the ends of this PDF.


Take the dress fabric and the template for the front bodice. Fold the fabric to fit the width of the template and place the template on the fold. Mark around it and cut to get the front bodice piece. Repeat the steps to get the front lining.


Let’s cut the back bodice. Here again, fold the fabric, but this time, place the template for the back bodice, along the edge of the fabric. Mark around it and cut to get two pieces for the back bodice (the back part of the dress is done in two pieces, for button opening). Repeat the steps to get the back lining pieces.


Your bodice-front, bodice –back and lining pieces will look like the picture above.
Next, we cut the skirt pieces.
*Note that the same template is used for the front and back skirt pieces. We first cut the back skirt pieces and then cut the template short to get the front skirt template.


Take the skirt template, fold the fabric, and place the template on the edge of the fabric. Cut around the template to get the back skirt pieces.


Cut along the dashed line (center back) of the skirt template to get the front skirt pattern piece.


Next, take the template for the skirt, fold the fabric to fit the width of the template and place it on the fold. Cut around the template to get the front skirt piece.


Your front and back skirt pieces would look like the picture above.


Cut the ruffle and side tie pieces, also referring to the table-3 above.


Fold the fabric for the sleeve ruffle and place the template on the edge. Mark around the template and cut to get two ruffle pieces. Repeat to get two more of the same.


Your sleeve ruffle pieces would look like the above.
Sewing


Take the two back bodice pieces and place them over the front bodice piece, with the right sides together, aligning the shoulders and sew the shoulders shut (picture for illustration purpose).


Press the seams open.


Next, take the lining pieces, fold the lower edges towards the wrong side by 3/8-inch, and press to set. Sew the front and back lining pieces together, just as the bodice pieces.


Take two of the sleeve ruffle pieces, layer them with the right sides together, and aligning the edges. Sew along the curved edge to join. Cut few notches along the curved seam to reduce the bulk. Turn over to the right side and press flat.
Next, we need to gather the sleeve ruffle. For that, we turn the upper thread tension of the machine to zero and the stitch length to the longest to get a basting stitch.


Sew a basting stitch along the straight raw edge of the sleeve ruffle. Pull the thread from the bobbin gently and gather the ruffle to half the length. Repeat the steps with the other two sleeve ruffle pieces to get the other one ready.
Change the machine settings back to normal.


Take one of the gathered sleeve ruffles, fold it equally in half and mark the center (along the raw edge). Align the center with the shoulder seam and pin the entire raw edge of the sleeve ruffle to the edge of the armhole, on the right side of the bodice. Repeat the steps with the other ruffle. Turn the machine settings back to normal and sew the ruffle to the armholes, removing the pins as you go.


Place the bodice lining over the main bodice, with the right sides together, aligning the center back, neck and armholes. Pin and sew along the neck and center back, and also along the two armholes. *Note that you need to leave 3/8-inch along the lower edges of the bodices for skirt attachment.


Clip the edges and cut the corners.


Pull the right side of the back bodice out, through the shoulders. Keep pulling the back bodice on either side, till the whole bodice is turned inside- out.


Poke the edges sharp, with the help of your scissors and press taut ( take care not to poke through the seam).


Topstitch along the armholes, neck, and buttonhole edges, leaving 3/8-inch at the lower edge for skirt attachment.


Next, align the side seam of the back and front bodices. You can see that the back bodices overlap along the center back. This is where the buttons are attached. Make a small dot along the lower edge to mark the overlap.
We move on to the skirt.


Sew a basting stitch along the upper edge of the front skirt piece and gather it. Adjust the gathering to make it uniform and to fit the lower edge of the front bodice.
Let’s gather the back skirt pieces. We need to finish the center back of the skirt for the button opening.


Fold the straight edge, (center back) of one of the back skirt piece by 3/8-inch towards the wrong side and press. Fold again by 1/2-inch and press once more. Sew the fold down along the edge. Repeat the steps with the other back skirt piece.
Next, we need to gather the back skirt pieces.


Sew a basting stitch along the upper edge of the back skirt pieces and gather them by pulling the thread from the bobbin. Adjust the gathering to fit the lower edge of the back bodice.
Let’s attach the skirt pieces to the back and front bodices.


Align the ruffled edge of the front skirt along the lower edge of the front bodice, with the right sides together and pin all along. *Note: take care to keep the lining away while pinning,


Sew the skirt to the bodice, removing the pins as you go.


Next, take the gathered back skirt pieces and pin it along the lower edge of the back bodice pieces, such that the folded edges come along the center back (button edge). Here again, avoid pinning the bodice lining. Sew the skirt pieces to the bodices.


Turn the waist seam up, towards the bodice and place the folded edge of the lining over the seam. Turn over to the right side and topstitch along the seam line carefully to sew the lining shut, covering the waist seam. You may optionally hand-sew the folded edge of the lining to the waist seam.
We move on to the side ties.


Take one of the fabric pieces required for the ties. 1) Fold the two longer edges towards the wrong side by 3/8-inch and press. 2) Fold it in half lengthwise, with the wrong sides together and press once again. 3)Cut one of the shorter edges slanting as shown. 4) Flip the tie over to the wrong side and sew the slanting edge shut, keeping the folds along the edges intact. 5) Clip the corner with the help of your scissors. 6) Flip the tie over to the right side and poke the corner out. 7) Sew it shut along the edge of the fold. Repeat the steps to get three more of the same.


Place the short straight edge of the ties along the side seam, just below the armhole, on the right side of the dress and pin. Repeat the steps with the other ties on the other side seams of the dress. Sew the ties to the dress.


Next, we need to sew the back skirt shut for ruffle attachment. Keep the button edges of the skirt overlapping, following the mark earlier made on the back yoke. Topstitch the skirt shut, from the lower edge, leaving 2-inches from the waist seam.
Let’s do the ruffles. We need to hem the ruffle before gathering it.


1) Take the fabric strips for the ruffle and join them along the shorter edges (you will need to join two strips for the front and two for the back). 2) To hem the ruffle, fold one of the longer edges of the ruffle by ½-inch twice and press. Repeat the steps on the two shorter edges. One of the longer edges is left raw; this is where we gather the ruffle. 3) Sew down the three folds.


Sew a basting stitch along the raw edge of the ruffle. Pull the thread from the bobbin gently and gather it. Repeat the steps to get the second ruffle.
Let’s start with the front skirt. Adjust the gathering in the ruffle to make it uniform and to fit the lower edge of the front skirt.


Starting from below the armhole curve, align the raw edge of the ruffle with the raw edge of the front skirt, with the right sides together and pin (keep the ties pinned together to keep it away from getting sewn into the side seams). Repeat on the back skirt with the back ruffle.


Turn the machine settings back to normal and sew the ruffle to the skirt. Flip the ruffle to the right side and topstitch along the seamline of the ruffle and skirt to make it look neater.
Next, we need to hand-sew the buttons.


Starting from the top edge, make markings at 2-inches gap from each other, on the right side of one of the back bodice pieces and hand sew the buttons. Make markings with a 2-inch gap on the wrong side of the other back bodice piece also and hand sew the complimentary snap buttons. I suggest you use 10 mm sew-on snap buttons for closure. If you are comfortable sewing buttonholes on your machine, that is a good alternative too.
Cut off the hanging thread and our dress is done!
Find the webstory to the pattern here Sewing a Vintage-Style Baby Pinafore
Pin it for later here,


Glenda Honeycutt
Monday 7th of April 2025
Can’t wait to see this dress
Amanda Reed
Thursday 30th of March 2023
Thank you for the patterns! I just finished this pinafore for my granddaughter and it is adorable!
Kathy
Saturday 16th of April 2022
Thank you for such cute kids' clothes! I love them!
Kathy
Friday 15th of April 2022
I'm sorry, but I couldn't find where to enter my address for the free template download. Did I misread the instructions? Thank you for the cute dress!
Surayya
Friday 15th of April 2022
You may find a blue box in the " materials required" section of the pattern. Kindly enter your e-mail address and click the subscribe button in the blue box to download your pattern pieces.
Glenna Colangelo
Friday 19th of June 2020
I love your patterns! Thank you for sharing. My only problem is that my granddaughter keeps growing!!! Do you have some in toddler sizes?
Surayya
Friday 19th of June 2020
I am glad you like my patterns. I have the same pattern in higher sizes from newborn to 4 years. It is a paid version and you can find it here, https://sewcraftyme.com/2018/02/flutter-sleeve-pinafore-sewing-pattern.html